
Spalling Brick Chimney: Why the Outside of Your Chimney Is Crumbling (Seattle Climate Guide)
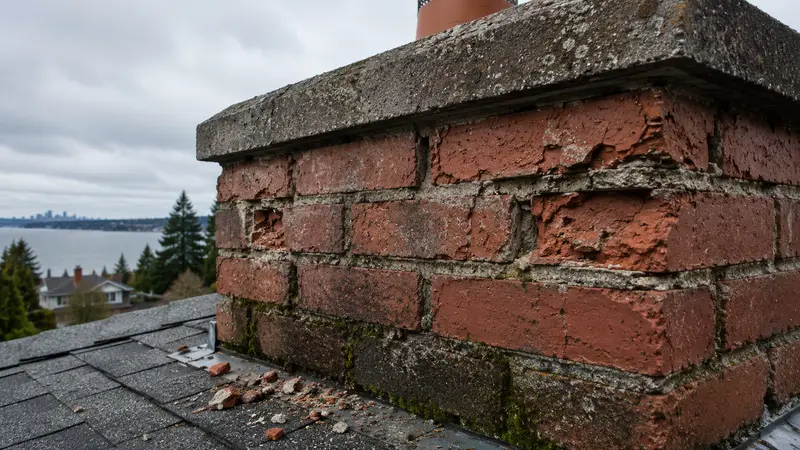
If you've noticed small flakes of brick on the ground next to your chimney, a layer of red dust on the roof, or whole brick faces popping off and sliding down the shingles — that's spalling. It's one of the most common chimney problems we diagnose in Seattle, and it's almost always caused by the same thing: water that's already inside the brick.
What Spalling Actually Is
Spalling is the process of brick breaking apart from the inside out. The outer face flakes, cracks, and eventually sheds in chips or layers, leaving a pitted or scooped-out surface. It looks cosmetic from the ground — like the brick is just weathering — but the failure is structural. Once the protective face of a brick is gone, moisture penetrates faster, the damage accelerates, and the structural integrity of that course of brick is permanently compromised.
The bricks themselves haven't gotten weaker with age. What's happened is that water has worked its way into the brick body and is now expanding faster than the brick can absorb the stress.
Why Seattle Chimneys Spall More Than Most
Three Pacific Northwest factors stack up to make spalling worse here than in most of the country.
Freeze-thaw cycles. When water inside a brick freezes, it expands roughly 9 percent. If the freeze is hard enough or the brick is saturated enough, the expansion fractures the brick from within. Seattle doesn't see brutally cold winters, but it sees a high number of freeze-thaw events — temperatures crossing 32°F many times each winter. That repeated cycling is more destructive than a single deep freeze.
Persistent moisture. Brick is porous by design. In an arid climate, brick wets and dries quickly; in Seattle, brick stays damp for weeks at a time during fall and winter. That gives water more opportunity to penetrate deeper into the brick body before the next freeze event.
Older housing stock with softer brick. Many Seattle chimneys on Craftsman, Tudor, and mid-century homes were built with common brick or early-fired brick that has a lower freeze-thaw resistance than modern engineered brick. Pre-1960 chimneys are spalling candidates almost by default.
The Three Causes We See Most Often on Seattle Chimneys
Spalling is rarely random. When we inspect a spalling chimney, one of these three issues is almost always the underlying driver.
- A failing or missing crown. The crown is the concrete cap at the top of the chimney. A cracked or missing crown lets water pour straight into the masonry from above. We see this on most spalling chimneys built before 1980 — the original crown was either too thin or has cracked from freeze-thaw movement.
- No chimney cap. An uncapped flue is an open drain. Rain falls directly into the chimney and saturates the masonry from the inside. Most older Seattle chimneys we inspect have no cap at all.
- Wrong mortar used in a previous repair. If your chimney was repointed in the past 20-30 years with hard modern Portland-heavy mortar over softer historic brick, the mortar can trap moisture inside the brick body. The brick ends up failing before the mortar does. This is the failure pattern we explain in detail in our repointing vs. tuckpointing guide.
Cosmetic vs. Structural — How to Tell Which You Have
Not all spalling is urgent, but some absolutely is. The diagnostic divide is depth and location.
Likely cosmetic (monitor):
- Surface pitting only, on a few scattered bricks
- Spalling limited to the lower courses near grade (often from sprinkler spray)
- No mortar joints are open or recessed
- No visible cracks running across multiple bricks
Likely structural (act):
- Spalling concentrated near the crown or roofline (where water enters)
- Whole brick faces have sheared off, exposing the rougher interior
- Mortar joints are recessed, crumbling, or have visible vertical cracks
- Spalling on more than 25 percent of any visible chimney face
- You can see the chimney leaning, even slightly
- Water stains on the ceiling or walls near the chimney chase inside the house
Structural spalling has a direct safety dimension: a chimney shedding brick can drop pieces onto a roof, into a gutter, or onto a walkway. It also rarely fails gracefully — at some point a whole course can let go.
Why DIY Patching Almost Always Makes Spalling Worse
The instinct when you see a chipped or pitted brick is to patch the face with mortar or fill it with concrete patcher. This is the single most common DIY mistake we see, and it usually accelerates the problem.
The reason: the underlying brick is failing because water is trapped inside it. Coating the face with non-breathable mortar or sealer prevents the brick from drying outward, but doesn't stop water from entering through the crown, the cap, or the mortar joints above. The brick keeps absorbing water, the trapped moisture has nowhere to go, and the next freeze-thaw event spalls the patch off along with another layer of brick.
Spalling has to be repaired from the cause down, not the face up. That means stopping the water source first — crown, cap, flashing, repointing — before any face restoration is done.
What Repair Actually Looks Like
Once the moisture source is addressed, there are three paths forward depending on damage extent.
Brick replacement. Individual spalled bricks can be cut out and replaced with matching salvaged or new brick. This works when fewer than a handful of bricks have failed and the surrounding masonry is sound.
Partial rebuild. When a section of a chimney face — typically the upper courses — has spalled extensively or shows mortar failure, we rebuild that section using period-appropriate brick and the right mortar mix for the existing brick's hardness. For homes built before 1930, we use Type O or natural cement mortar; modern brick generally takes Type N. This is the work covered on our chimney rebuild service page.
Full rebuild. If spalling has compromised the structural integrity of the entire chimney above the roofline, the only safe option is to take it down to the roofline (or further) and rebuild it with new brick, a properly sized crown, flashing, and a cap.
Waterproofing — applied with a breathable, vapor-permeable masonry sealer — is the final step on any spalling repair. We cover the right product choice in our chimney waterproofing guide. Standard concrete sealers will trap moisture and cause more spalling; the only sealers we use on chimneys are siloxane or silane-based vapor-permeable products.
When to Get It Inspected
Spalling is one of the issues that gets exponentially more expensive the longer it's ignored. A single course of replaced brick is a few hundred dollars; a partial rebuild is a few thousand; a full rebuild can run $8,000–$20,000+ depending on size and access. The triggering event between those costs is usually a single bad winter.
If you've noticed brick debris on your roof or at the base of the chimney — or if you can see pitted or sheared brick faces from the ground — schedule an inspection before the next wet season. We document spalling extent with photos at our chimney inspections and provide a written assessment of whether the damage is cosmetic, structural, or somewhere in between.
Related Reading
- Chimney Waterproofing in Seattle — what sealer to use, what not to use, and why standard concrete sealers cause more spalling than they prevent.
- Chimney Repointing vs. Tuckpointing — why mortar choice on older Seattle brick determines whether a repair lasts five years or fifty.
- Parts of a Chimney — Complete Anatomy Guide — understand where the crown, cap, and flashing fit and why they're the first line of defense against spalling.
If you're seeing brick debris, pitted faces, or cracked mortar on your chimney, our chimney masonry repair team can give you a clear written assessment. Contact us for a free estimate.
Genesis Home Services
Licensed, bonded, and insured fireplace and chimney specialists serving Seattle, Renton, Bellevue, Kirkland, and Issaquah. Schedule a free estimate →