
Parts of a Chimney — Complete Anatomy Guide (What Each Part Does and What It Costs to Fix)
When a chimney technician tells you your smoke chamber needs parging or your counter flashing has failed, do you know what they mean? Most homeowners don't — and that gap makes it easy to overpay, under-fix, or miss a real safety issue. Here's every part of a masonry chimney explained in plain language, from the top down.
Chimney Cap vs. Chimney Crown — Not the Same Thing
These two terms are used interchangeably by almost everyone, including contractors. They are completely different components.
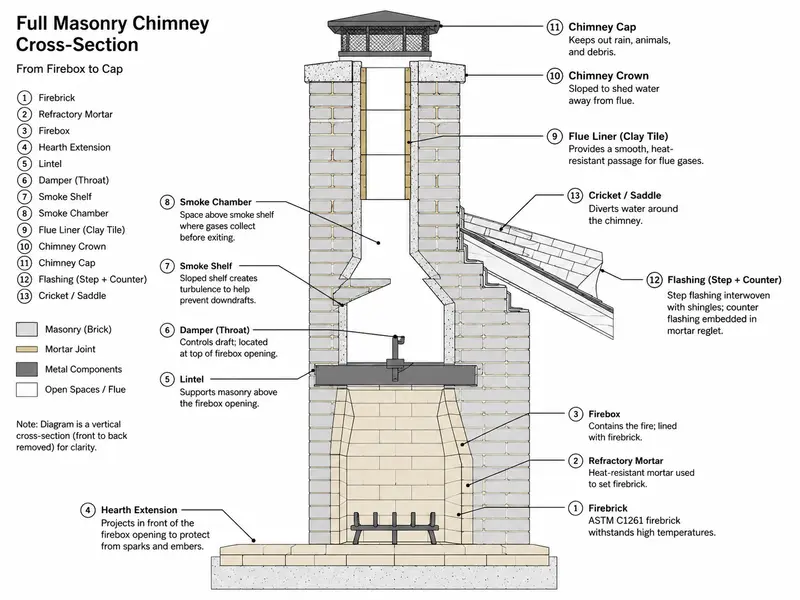
The chimney cap is the metal cover that sits directly over the flue opening. Its mesh skirt acts as a spark arrestor — stopping burning embers from landing on your roof. It also keeps rain, animals, and debris out of the flue. Missing cap = open invitation to birds, squirrels, and water. Galvanized steel caps last 10–15 years in Seattle's climate; stainless steel lasts 20–30 years. Replacement cost: $150–$500 installed.
The chimney crown is the concrete slab that covers the entire top surface of the masonry chimney — the flat or gently sloped surface surrounding the flue liner. The cap sits on top of it. Several things are critical about crown construction that most homeowners (and some contractors) don't know:
- It must be made from concrete, not mortar — mortar is far more porous and deteriorates rapidly at crown level
- It must slope downward at a minimum of 1 inch per foot to shed water away from the flue
- It must extend at least 2.5 inches past the chimney wall, with a drip edge on the underside
- A slip joint is required between the crown and the flue liner to allow thermal expansion — crowns built without it crack
In Seattle, freeze-thaw cycles at roof level hit chimney crowns hard. Water enters hairline cracks, freezes, expands about 9%, and widens the crack. Repair cost: surface patching $150–$400; full replacement $1,800–$3,000.
Chimney Flashing — A Three-Component System, Not Just Caulk
Flashing is where the chimney meets the roof — and it's the most common source of chimney-related water damage. Most people picture it as a strip of metal with some caulk around it. Properly installed flashing is actually three distinct components working together:
- Base flashing (pan flashing): L-shaped metal that runs up the chimney sides and tucks under the bottom course of shingles. Creates the foundation seal.
- Step flashing: Individual L-shaped pieces woven into each shingle course on the side walls — water steps down the roof rather than pooling against the masonry.
- Counter flashing: Installed by cutting a reglet (groove) directly into the chimney mortar joint and embedding the flashing into it. This is the only permanent method. Counter flashing that's surface-applied and held only with caulk fails within 24 months in Seattle — especially on south-facing chimneys that expand and contract with temperature swings.
Flashing repairs that last in the PNW require properly embedded counter flashing, not tube-of-caulk patchwork. If you see gray caulk on your flashing, that's the shortcut version. Flashing replacement cost: $800–$2,500 depending on chimney width and metal type.
The Cricket — The Component Nobody Talks About
One of the most overlooked parts of a chimney system, and critically important in Seattle's rainy climate. A cricket (also called a saddle) is a small peaked structure — like a miniature roof ridge — built on the uphill side of the chimney where it penetrates the roof slope.
Without a cricket, the vertical back wall of the chimney creates a dam. Water, leaves, moss, and debris pool against the back of the chimney during Seattle's 156+ annual rain days. That standing water saturates the masonry, overwhelms even good flashing, and eventually finds its way inside.
The International Residential Code (IRC) requires a cricket on any chimney wider than 30 inches measured perpendicular to the ridge. In Seattle's climate, many masons install them even on narrower chimneys. A cricket requires its own step flashing and counter flashing system. Cost: $3,000–$5,500 depending on chimney width and roof pitch.
Damper — Throat vs. Top-Mount (and Why It Matters)
Every wood-burning fireplace has a damper — but there are two very different types, and they perform completely differently.
A throat damper sits just above the firebox opening at the base of the smoke chamber. It's a hinged metal plate you open and close with a handle or rod. The problem: even when "closed," a throat damper never creates an airtight seal. Metal sitting in a masonry opening exposed to the elements corrodes, warps, and eventually stops closing fully. Every closed throat damper is leaking conditioned air upward and letting cold air in.
A top-mount damper sits at the very top of the flue, operated by a stainless steel cable that runs down to a clamp inside the firebox. When closed, a rubber gasket creates a true airtight seal — dramatically reducing energy loss. It also functions as a chimney cap. For Seattle homes, top-mount dampers have an additional benefit: they keep the flue interior warm and dry, which improves draft and reduces moisture accumulation on the smoke shelf below. Cost installed: $200–$400.
Smoke Shelf — More Than Just a Debris Catcher
The smoke shelf sits directly behind the throat/damper at the base of the smoke chamber. Most explanations describe it as a ledge that collects rain, leaves, and debris before they fall into the firebox. True, but that's only half the story.
The smoke shelf's more important function is backdraft prevention. Cold air from outside descends down the flue. When it hits the smoke shelf, it's forced to reverse direction — allowing warm combustion gases to continue rising while the cold air column turns around. Without a properly sized smoke shelf, cold downdrafts push directly into the firebox and smoke into the room.
In Seattle, where winter temperatures hover near freezing and flues cool down significantly between uses, the smoke shelf's role in maintaining draft is especially significant. The shelf should be cleaned at every annual sweep — debris accumulation there is a major creosote source, and standing rainwater on the shelf causes the damper above it to rust from below.
Smoke Chamber — NFPA 211's Most-Ignored Requirement
The smoke chamber is the pyramidal space above the smoke shelf that tapers inward from the wide firebox opening up to the narrow flue liner. Its job is to compress expanding combustion gases into the flue without turbulence.
Here's the detail almost every competitor's blog skips: NFPA 211 §11.2.1.13 requires smoke chamber interior surfaces to be parge coated smooth with insulating refractory mortar. Traditional smoke chambers are built with corbeled (stepped) brick — stair-step courses that taper inward. The rough, turbulent interior surface slows rising gases and causes excessive creosote buildup. Parging smooths those surfaces.
An unparged corbeled smoke chamber is a code violation in new construction and is almost universal in older Seattle homes that have never been restored. If you've ever wondered why your fire smokes or your chimney sweeper finds heavy creosote deposits every year, an unparared smoke chamber is often why.
Firebox — The Combustion Chamber
The firebox is the brick-lined chamber where the fire actually burns. It's constructed from firebrick (ASTM C27 or C1261) set in refractory mortar (ASTM C199, medium duty) — specialized materials designed to withstand temperatures above 2,000°F. Standard brick and Portland cement mortar cannot survive firebox conditions.
Code minimums: 20 inches minimum depth, 8 inches minimum wall thickness (with firebrick lining), firebrick joints no wider than 1/4 inch. The hearth extension — the non-combustible pad in front of the opening — must extend at least 16 inches from the opening and 8 inches to each side.
Hairline cracks in firebox mortar joints are common and expected from thermal cycling. Cracks wider than 1/16 inch, or any cracks through the firebrick itself, require professional evaluation. Structural cracks are a CO hazard — combustion gases can migrate through gaps into wall cavities and the living space. See our complete guide to firebox repair vs. rebuild for how to evaluate what you're looking at.
Flue and Flue Liner — The Safety-Critical Core
The flue is the vertical passageway from the firebox to the chimney top. It's not just an open column — it's a calibrated system. The flue's cross-sectional area must be correctly sized to the firebox opening: approximately 1:10 (flue area = 1/10th of fireplace opening area for taller chimneys). An undersized flue causes smoke spillage; an oversized flue creates sluggish draft.
The flue liner is the inner surface of the flue — the material combustion gases actually contact. Three types exist:
- Clay tile: Traditional, cost-effective in new construction. Cannot be used to reline an existing chimney. Susceptible to thermal shock cracking. A single cracked tile renders the chimney non-compliant per NFPA 211. In older Seattle homes, clay liners are often crumbled or have open joints — with no visible exterior symptom.
- Stainless steel (flexible or rigid): The preferred relining option. Available in 304 and 316Ti grades (316Ti for oil/gas). Can be insulated with a wrap blanket. Installed cost: $900–$3,800 depending on flue height and configuration.
- Cast-in-place: Poured around a form inside the existing flue — creates a monolithic liner. More expensive ($2,000–$7,000) but appropriate when the existing flue is irregular or damaged.
Relining is required whenever you change fuel types (wood to gas, or gas to wood) because different fuels produce different temperatures and condensate chemistry. See our chimney relining service for what's involved.
Gas Fireplace Venting — B-Vent vs. Direct-Vent vs. Power-Vent
Gas fireplaces have their own anatomy — and the venting type determines both efficiency and maintenance requirements.
B-vent (natural draft): Uses a double-wall metal pipe. Draws combustion air from inside the room. Must vent vertically through the roof only. Efficiency approximately 50–60% — warm room air is consumed and exits up the flue. Requires a tall vertical run for adequate draft.
Direct-vent: Sealed glass panel. Uses a coaxial (pipe-within-pipe) system — outer pipe draws outside combustion air in; inner pipe exhausts gases out simultaneously. Can vent horizontally through a side wall or vertically. No room air consumed. Efficiency 70–90%+. Sealed combustion prevents backdraft and CO infiltration. This is the preferred option for Seattle — the sealed system also prevents moisture-laden outside air from contacting internal surfaces.
Power-vent (induced draft): Like direct-vent but adds a small electric blower to force circulation. Allows much longer horizontal runs and multiple bends — useful for large homes, basements, or commercial applications where standard venting runs aren't practical. Requires electricity; will not operate during power outages.
What This Means for Your Annual Inspection
NFPA 211 defines three inspection levels for a reason. A Level 1 inspection covers accessible exterior and interior surfaces — what your technician can see during a standard sweep. A Level 2 includes a video camera scan of the entire flue liner interior, and is required for home purchases, fuel type changes, or after any chimney event. Many Seattle homeowners have never had a Level 2 even after decades of use.
If you're buying an older Seattle home with a wood-burning fireplace — especially a Craftsman bungalow or Tudor built before 1950 — a Level 2 inspection is essential. Original clay tile liners in these homes are often deteriorated past safe use, with no exterior signs of failure.
Related Reading
- Chimney Repointing vs. Tuckpointing — the distinction that determines whether new mortar lasts 25 years or 3, and why Portland cement destroys old brick.
- Firebox Repair vs. Rebuild — how to evaluate firebox cracks, which repair products do what, and the CO hazard mechanism most homeowners don't know about.
Schedule a chimney inspection with Genesis Home Services. We carry out Level 1 and Level 2 inspections throughout Seattle and King County, with a written report after every visit.
Genesis Home Services
Licensed, bonded, and insured fireplace and chimney specialists serving Seattle, Renton, Bellevue, Kirkland, and Issaquah. Schedule a free estimate →