
Refractory Mortar vs. Regular Mortar: Why the Wrong One Destroys a Fireplace Repair
When a Seattle homeowner calls us about firebox bricks falling out or mortar crumbling between firebricks, more than half the time we trace it back to one root cause: the previous repair used regular masonry mortar instead of refractory mortar. The job looked fine when it was finished. After a season of fires, it failed worse than the original damage.
What Refractory Mortar Actually Is
Refractory mortar is a specialized high-temperature mortar designed to bond firebrick inside a fireplace, furnace, or wood stove. It holds together at temperatures regular mortar can't survive — generally rated for sustained exposure to 2,000°F or more, with peak tolerances above 3,000°F depending on the product.
Regular masonry mortar — Type N, Type S, Type O, Portland-lime mixes — is engineered for structural strength, weather resistance, and bonding to brick at ambient temperatures. It is not engineered for direct flame contact. When you fire a fireplace built with regular mortar in the firebox, the temperatures routinely exceed what the mortar was formulated for. The mortar starts to fail almost immediately.
How Regular Mortar Fails Inside a Firebox
The failure pattern is consistent enough that we can usually identify the wrong-mortar problem before we even touch the chimney. Here's what happens.
Heat shock. Regular mortar contains lime and Portland cement, both of which begin to break down chemically above about 600–900°F. A wood fire in an open firebox routinely produces temperatures in the 1,000–1,500°F range at the back wall — well past that threshold. The first few fires bake out the moisture, the next several start cracking the mortar matrix.
Thermal expansion mismatch. Firebrick expands and contracts with each fire. Refractory mortar is formulated to expand at roughly the same rate as the firebrick it bonds. Regular mortar expands at a different rate, so each fire creates microscopic shear between the brick and the mortar joint. Within a season, those joints open up.
Steam and gas off-gassing. Regular mortar contains chemically bound water. When heated above 400°F, that water vaporizes and forces its way out through the surface of the mortar — pitting, popping, and weakening the joint as it goes.
The end result is a firebox where you can fit a fingernail (or eventually a finger) into the mortar lines, bricks have begun shifting position, and pieces of mortar fall into the firebox during use. Once that's happening, the bond is compromised and the firebox needs to be re-laid with the correct material.
Where Refractory Mortar Is Required (Not Optional)
Refractory mortar is the only correct mortar for any masonry surface that has direct flame or hot flue gas contact. That includes:
- All firebrick joints inside the firebox — back wall, side walls, floor (where applicable)
- The smoke chamber above the damper, where flue gases first concentrate
- Clay flue tile joints (sometimes — varies by liner system)
- Damper installation when the damper sits directly on masonry
- Fireplace inserts where masonry needs to bond to the metal surround inside the firebox area
Outside of those direct-fire surfaces — the exterior chimney structure, the crown, the chase, the area above the smoke chamber — regular masonry mortar is correct and refractory mortar would be the wrong choice. The two products are not interchangeable in either direction.
How to Tell If Your Firebox Has the Wrong Mortar
You don't need lab equipment. The visual cues are usually clear once you know what to look for.
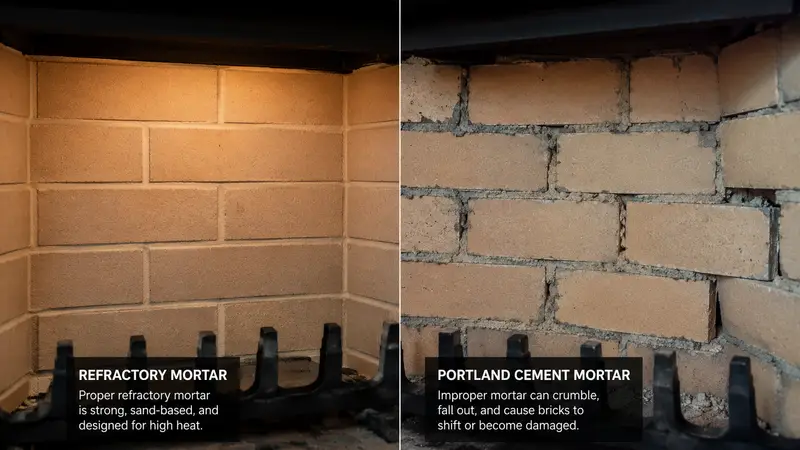
- Color: Refractory mortar is typically pale buff, tan, or off-white. Regular masonry mortar is gray or sometimes slightly red-tinted. If your firebox joints look like the gray mortar on your driveway, that's a problem.
- Texture: Refractory mortar tends to be smoother and finer-grained than common Portland-mix mortars. Visible aggregate (sand grains, small stones) in the firebox joints usually means standard mortar.
- Crumbling: The single clearest indicator is mortar that's actively falling out of the joints. Refractory mortar, properly installed, will outlast the firebrick around it. Regular mortar starts releasing within a heating season or two.
- Joint width: Firebrick is laid with very thin joints — usually 1/16 to 1/8 inch. If you see wide joints (3/8 inch or more) with visible gray mortar between firebricks, both the material and the technique are wrong.
The Two Types of Refractory Mortar — and When to Use Which
There are two main families. Both are correct in the right application; using the wrong one is another common source of failure.
Air-set (or air-dry) refractory mortar. Cures on exposure to air at room temperature. The most common consumer-available type — Rutland, Meeco's Red Devil, and similar are air-set products. Air-set mortar reaches partial strength as it dries and full strength after the first few firings. It's appropriate for most residential firebox repointing and small replacements.
Heat-set (or hydraulic-set) refractory mortar. Requires heat to cure properly — generally a sustained firing at 500°F or more after a drying period. Heat-set mortar achieves a more chemically stable bond and is preferred for full firebox rebuilds, professional wood stove installations, and any application where the bond must hold against significant thermal cycling. It's the type we use for full firebox rebuilds.
For homeowner DIY work, air-set is generally the right product. For anything that involves removing and resetting multiple bricks or rebuilding a section of firebox, heat-set or a professional-grade refractory installed by a mason is the right approach.
When You Can DIY and When You Shouldn't
Honest answer: small joint repairs are reasonable DIY work if the rest of the firebox is sound. A handful of joints in good firebrick where the original refractory mortar has crumbled or fallen out — yes, you can grind out the old material, mix air-set refractory mortar to package directions, and repack the joints. The work isn't difficult if you take your time.
What's not DIY territory:
- Replacing more than a few firebricks (sourcing matched brick, cutting to size, leveling courses, and re-establishing the firebox geometry takes experience)
- Any joint or brick repair where the damper, smoke chamber, or throat is also affected
- Repairs to fireboxes where there are also exterior masonry issues — usually they share a root cause and need to be addressed together
- Any repair on a wood stove or insert where venting clearances or hearth specifications could be affected (these have specific code requirements per NFPA 211)
The reason we recommend professional repair for anything beyond minor joint work isn't gatekeeping — it's that firebox failures have a direct CO and fire safety dimension. A poorly bonded firebrick that shifts during a fire can expose the framing behind the masonry to direct heat. NFPA 211 — the national standard for chimneys, fireplaces, and venting — calls for inspection any time a firebox has been modified or repaired, regardless of scope.
What This Costs to Do Right
For context on what professional firebox repair runs in Seattle: minor joint repointing typically falls in the $400–$900 range, larger section repair $900–$2,500, and full firebox rebuild $2,000–$5,000+. The largest cost variable is firebrick sourcing — for older fireboxes that need matched historic brick, material costs and lead time both go up. Our firebox repair vs. rebuild guide walks through the cost progression in more detail.
Related Reading
- Firebox Repair vs. Rebuild — How to Tell Which One You Need — diagnostic guide for figuring out whether your firebox needs minor work or a full rebuild.
- Chimney Repointing vs. Tuckpointing — the exterior-mortar version of this same question: why mortar choice determines repair longevity.
- Parts of a Chimney — Complete Anatomy Guide — where the firebox fits in the larger chimney system.
If you're looking at crumbling joints, falling bricks, or a firebox that doesn't look the way it used to, our chimney masonry repair team can give you a written assessment with photos of what's happening and what the repair scope looks like. Contact us for a free estimate.
Genesis Home Services
Licensed, bonded, and insured fireplace and chimney specialists serving Seattle, Renton, Bellevue, Kirkland, and Issaquah. Schedule a free estimate →